
1
Loading...
Introduction
The Raspberry Pi is a series of small single-board computers developed in the United Kingdom by the Raspberry Pi Foundation (www.raspberrypi.org) to promote the teaching of basic computer science in schools and in developing countries. The first Raspberry Pi known as the Model A was release in February 2012 and by June 2019 more than 25 million had been sold world-wide. The Raspberry Pi is slightly larger than a credit card and costs approx NZD$65.
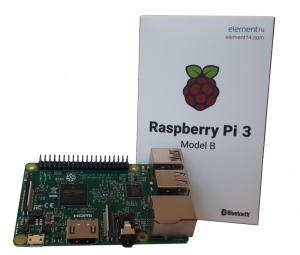
RaspberryPi Single Board Computer
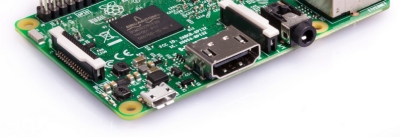
You can connect a Raspberry Pi to a wired or wireless network and along with four USB ports you can attach external devices such as a keyboard, mouse, or external USB storage device. Because of it's small design, the Raspberry Pi consumes only a very small amount of energy. The Raspberry Pi requires a 5v 2.5a power supply via a micro-USB connector.
This makes for a small, cheap, energy saving but powerful computer and positions the Raspberry Pi as an ideal device for a lightweight desktop offering web browsing, e-mail, office productivity and printing.
The Raspberry Pi stores it's operating System on a microSD card. The recommended operating system is Raspbian which is a free and open source operating system based on Debian Linux. Raspbian has been optimised for the Raspberry Pi hardware and has solid a support community.
This site focuses on the Raspberry Pi Model 3. While there have been several other variants of the Pi, it's the Model 3 which offers overall the best performance and capability.
Despite it's size and features, Raspberry Pi is a great device and has a wide variety of opportunities, from a desktop to a media player, a retro gaming console and even a seismograph, the possibilities are literally endless!
Raspberry Pi Hardware
The Raspberry Pi is a very small single board computer that comes in a very small box. In order to get and and running you will need the following hardware items:
The next few pages will discuss all of the required hardware in a little more detail.
Hardware
Raspberry Pi Computer
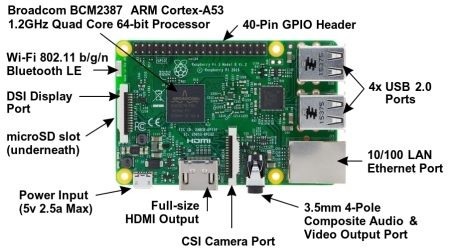
The Raspberry Pi Model 3 on which this site focuses on has the following specifications:
Feature:
Model 3 B
Model 3 B+
CPU:
Broadcom BCM2837 Quad Core 1.2GHz 64bit CPU with 1GB RAM
Broadcom BCM2837BO Quad Core 1.4GHz 64bit CPU with 1GB RAM
Video GPU:
Broadcom VideoCore IV @ 250 MHz (3D part of GPU @ 300 MHz, video part of GPU @ 400 MHz, OpenGL ES 2.0 (28.8 GFLOPS)
Networking:
1x 10/100mb LAN Ethernet Port
BCM43438 2.4GHz Wi-Fi (802.11b/g/n)
Bluetooth 4.1 Low Energy
BCM43438 2.4GHz Wi-Fi (802.11b/g/n)
Bluetooth 4.1 Low Energy
1x 300mb Gigabit LAN Ethernet Port
RK3399 2.4GHz and 5GHz Wi-Fi (802.11.b/g/n/ac)
Bluetooth 4.2 Low Energy
RK3399 2.4GHz and 5GHz Wi-Fi (802.11.b/g/n/ac)
Bluetooth 4.2 Low Energy
USB:
4x USB 2.0 ports
Display Output:
Full-size HDMI port
3.5mm 4-Pole stereo output and composite audio & video port
3.5mm 4-Pole stereo output and composite audio & video port
Expansion Ports:
40-pin extended GPIO header
CSI camera port for connecting a Raspberry Pi camera
DSI display port for connecting a Raspberry Pi touchscreen display
CSI camera port for connecting a Raspberry Pi camera
DSI display port for connecting a Raspberry Pi touchscreen display
Storage:
Micro USB card slot
Power Input:
Micro USB 5v power source 2A - 2.5A (max)
Micro USB 5v power source 2A - 2.5A (max)
Power-over-Ethernet (PoE) support (requires separate PoE HAT)
Power-over-Ethernet (PoE) support (requires separate PoE HAT)
Boot Options:
MicroSD
USB Boot
Ethernet
USB Boot
Ethernet
Hardware
microSD card Storage
 The Raspberry Pi utilises a microSD card to hold the BIOS boot file and the Raspbian operating system. It offers the convenience of quick removal and given the relatively low cost of microSD cards, you can repurpose the Raspberry Pi with different operating systems and/or software for different purposes.
A downside to using microSD cards is the performance. Your average card will give write speeds of approx 20-30MB/s depending on the manufacturer, compared to your current desktop SSD which might give a write speed of 500MB/s+. Given the purpose of the Raspberry Pi is a low cost educational computer, microSD cards are ideal choice.
When choosing a microSD card consider the following:
- Use Class 6 or Class 10 microSD cards
- Minimum 6GB capacity - 16GB or higher recommended
- Avoid disapointment and invest in a quality microSD card.
To configure the microSD card you'll need another computer with a microSD card reader to write the image too. You can buy small USB multi-card readers if your computer or laptop doesn't have a card reader built-in. Instructions on copying OS images to the SD cards is covered in the software section.
NOTE: SD cards in general were never developed to run an operating system. They are typically found in phones, and cameras where they not under constant IO activity. If you opt for a cheap brand microSD card you might experience a card failure and full data loss. It's a good idea to ensure you have backups of data to either a USB key, another computer or a cloud storage.
Refer to elinux.org/RPi_SD_cards for informtion on tested microSD cards.
USB Storage (optional)
With the Raspberry Pi Model 3 B you now have the option to ditch the microSD card altogether and utilise a USB boot capability and run Raspbian from a more robust for of storage such as a USB connected mSATA SSD or a USB external hard-drive. This is highly recommended if you want to use your Raspberry Pi to retain data with minimal risk... however a wise man will still back it up.
In the Installation section you'll find instructions on enabling the USB Boot capability.
Hardware
Power Supply
The Raspberry Pi 3 is powered by a 5.1V micro USB supply. It is highly recopmmended to purchase a power supply rated at 2.5A (Max) from a reputable brand. To make life easier purchase the Official Raspberry Pi Power Supply, which is available all Raspberry Pi stockists. This will ensure within reason, you are able to power most of the peripherals you plug into your Pi however exactly how much current (mA) the Raspberry Pi will require is dependent on what you connect to it.
Typically, the maximum power the Raspberry Pi 3 Model B can use is 2.5 Amp. If you need to connect a USB device or devices that will take the total USB power requirements above 1.2 Amp, then you must connect those peripherals to an externally-powered USB hub.
When using a USB powered Hub be wary of back powering. Back powering occurs when USB hubs do not provide a diode to stop the hub from powering against the host computer with some hubs even providing as much power as you want out each port. This means that the hub will power the Raspberry Pi through it's USB cable input cable, without the need for a separate micro-USB power cable, and therefore bypass the onboard voltage protection. Should the hub supply too much power or experience a power surge, your Raspberry Pi could potentially be damaged.
Keyboard + Mouse
Well all computers require a basic input device and the Raspberry Pi is no exception. With keyboards and mice you have 4 choices - wired or wireless, integrated or separate. Depending on what you plan on using your Raspbery Pi for might help you pick the most appropriate keyboard/mouse combination. For example using the Raspberry Pi as a desktop computer you may repurpose an old wired USB keyboard and mouse. If using the Pi as a media player you might opt for a compact wireless keyboard with an integrated trackpad.
Power requirements are generally not an issue for wired keyboards and mice, however some wireless devices require up to 1A from the USB port. Always check the power rating of the USB device.
Screen + Cable
Plugging your Raspberry Pi into an HDMI capable monitor is the easiest means of viewing the output of the computer. Most modern computer screens will be equipped with atleast one, if not two, of the following input types:
- HDMI
- DVI
- Display Port
- VGA
If the budget is a bit tight you can always plug your Raspberry Pi in to your TV via an HDMI port either on the side or rear of the TV.
The Raspberry Pi is equipped with an HDMI output port so the best option is to connect the Pi to the screen via a standard HDMI cable. If your monitor doesn't have HDMI you'll need to source either an HDMI to VGA/DVI/Display Port cable or an adaptor plug that accepts HDMI and converts to one of the other formats. The length of the cable will be determined by your intended use.
Operation System Options
There are a bunch of free operating systems available to choose from. The obvious for any first-time Raspberry Pi user would be Raspbian. Here is a breakdown of the common operating systems.
Raspbian is the Raspberry Pi Foundation's official supported operating system. Drived from Debian LINUX, Raspbian comes pre-installed with plenty of software for education, programming and general use. It has Python, Scratch, Sonic Pi, Java, Mathematica, LibreOffice, Chrome Browser and more.
Raspbian also provides the Pixel desktop which will make using and navigating your Raspberry Pi very easy.
Download the image file from here: https://www.raspberrypi.org/downloads/raspbian/
NOOBS (New Out Of the Box Software) is an easy operating system installer which contains Raspbian. It also provides a selection of alternative operating systems like the ones listed below, which are then downloaded from the internet and installed.
Download the image file from here: https://www.raspberrypi.org/downloads/noobs/
Ubuntu Mate - The Ubuntu MATE image for the Raspberry Pi 3 is a community effort based on the regular Ubuntu armhf base. It has been optimised as much as possible however the microSD I/O throughput is still a bottleneck so a quality Class 6 or 10 microSD card is highly recommended. Ubuntu MATE 16.04 also fully supports the built-in Bluetooth and Wifi on the Raspberry Pi 3 and features hardware accelerated video playback in VLC and hardware accelerated decoding and encoding in ffmpeg
Download the image file from here: https://ubuntu-mate.org/raspberry-pi/
Ubuntu Snappy Core - For developers.
Download the image file from here: https://developer.ubuntu.com/core/get-started/raspberry-pi-2-3
Windows 10 Core for IOT - Microsoft have released a Windows 10 variant for the Raspberry Pi. Note: this is for developers and is not a end-user usable operating system.
Download the image file from here: https://developer.microsoft.com/en-us/windows/iot/getstarted
OSMC - Open Source Media Centre.
Download the image file from here: https://osmc.tv/download/
LibreElec - Just enough OS to run Kodi. Libre Embedded Linux Entertainment Centera small and very fast booting, open source JeOS (Just enough Operating System). LibreELEC is a complete media center software suite for embedded systems and computers.
Download the image file from here: http://libreelec.tv/
CENTOS has come from the work of a Special Interest Group.
Download the image file from here: https://wiki.centos.org/SpecialInterestGroup/AltArch/Arm32/RaspberryPi3
Installation
This section guides you through the basics of setting up a Raspberry Pi using the SD card as the primary storage device. The following sections are covered:
Writing an image to SD card using Etcher.
The first task you'll need to do after you have selected and downloaded and unzipped your operating system of choice is to flash the image to the microSD card. To do this you will need to use software capable of writing the image file to the microSD card.
Visit http://etcher.io to download and install the Etcher SD card image utility on your computer.
Start Etcher and select the image file you unzipped on your computer or laptop. Select the SD card drive and finally click the Flash button. You'll be presented with a progress indicator while Etcher is writing the image.

Installation
Plugging everything in
Now that you have your microSD imaged you can proceed with connecting it all up...
- Insert the SD card into the microSD card slot underneath the Raspberry Pi
- Plug in your monitor into the HDMI socket on the side
- Either directly connect a USB keyboard and mouse or the wireless receiever for a keyboard/mouse.
- If you are going to connect your Raspberry Pi to a wired network then plug in the Ethernet cable into the RJ-45 socket.
Note: If you plan on connecting to a Wireless Network you'll configure this later. - Plug in the USB power supply and turn on at the wall.
All going well you will see the Raspberry Pi boot up. Raspbian will automatically resize the file system, on first boot, to occupy the unallocated space of the microSD card.
The PIXEL desktop will automatically start next and you should end up with a desktop looking similar to this:
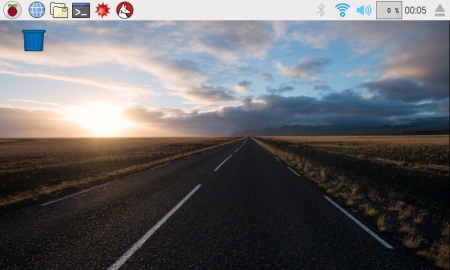
Raspbian "Stretch" PIXEL Desktop
Installation
Raspbi-config
Raspbian comes configured with UK settings by default. Locale settings now need to be configured to ensure your Raspberry Pi will function correctly. The examples below show the necessary settings for New Zealand.
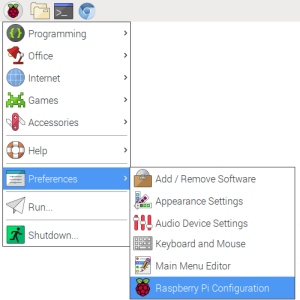
You can use either the command-line version in a terminal session or via the GUI version via desktop menu as described below.
Start the Raspberry Pi Configuration utility
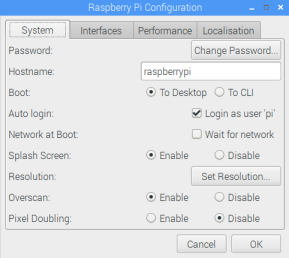
2
Raspberry Pi Configuration utility. Start by clicking the Change Password button.
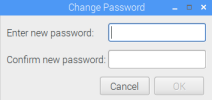
3
It is highly recommended to change the default password to something more secure. Click OK to save.
4
After setting the pasword click the localisation tab at the top and work through all 4 options here.
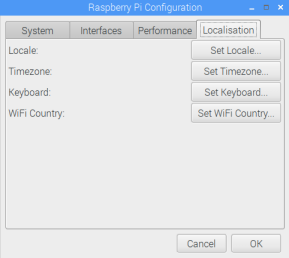
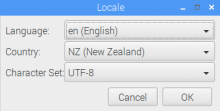
5
Set the appropriate language setting, Country and character set for your country. This will ensure the correct handling of characters and numercial presentation for your country.
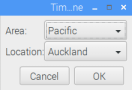
6
Set the appropriate timezone to ensure the correct time is displayed. Although the Raspberry Pi doesn't have a built in clock it gets the time from other devices on the network or via the Internet.
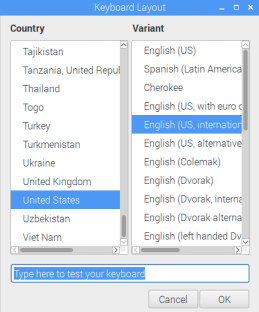
7
Select the appropriate keyboard type based on what you have connected. This will ensure the characters you have on your keyboard get displayed correctly for each key. Note: test a number of characters in the test area.
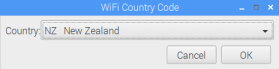
8
Set the Wi-Fi country code. Different country have different frequency channels so this needs to be set before attempting to use the Wi-Fi. It's always a good idea to set this even if you're only planning to use a wired RJ-45 LAN connection.
9
After making the necessary setting click the OK button and reboot the Raspberry Pi.
Installation
Configuring Wi-Fi
If you have choosen to use the Raspberry Pi's built-in Wi-Fi following through the follwing setps to configure the Wireless network settings.
Access the Network Interface Preferences via the Network icon at the top of the task bar.
Network Status icon - currently indication no network connectivity
Do this...
And that.
Some of this
And plenty of that
All going well you will have connect to your W-Fi access point.
Installation
Updating Raspbian
With the necessary Locale settings sorted you should now update your Raspbian image to the lastest version. This is a relatively straight forward process and gives you an opportunity to utilised the terminal command-line.
Open a terminal session by clicking on the Terminal icon on the task bar at the top of the desktop.
Terminal Icon
Enter the following command to get the lastest list of packages from the Raspbian repositories.
# apt-get update
Now update the relevant packages installed on your Rasbian image.
# apt-get upgrade
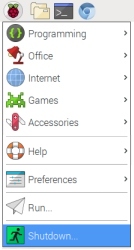
Reboot your Raspberry Pi by selecting Shutdown from the task bar menu and clicking Reboot from the Shutdown options popup.
After your Raspberry Pi has rebooted you've successfully completed the installation process!
Installation
Removing Unwanted Software
The Raspberry Pi was designed primarily for education use and therefore Raspbian is loaded with various educational software packages which you may wish to uninstall to recover spaces on your microSD card.
Run the following command in a terminal window to uninstall the packages listed.
sudo apt-get purge --auto-remove wolfram-engine mathematic-fonts scratch2 scratch sonic-pi nodered geany greenfoot claws-mail dillo idle3 python3-tk idle python-pygame python-tk
Installation
This page take you through the install process in order to setup a Raspberry Pi 3 with one of the following configurations:
- Boot of SD card (Default)
- Boot from USB drive
- Boot from mSATA on Pi Desktop
Power up the Pi with the SD installed, Raspbian will automatically resize the file system, on first boot, to occupy the unallocated space of the microSD card.
The PIXEL desktop will automatically start next.
Upgrade to the latest distribution of Raspbian
# apt-get update
# apt-get dist-upgrade
Delete unused software packages:
sudo apt-get purge --auto-remove wolfram-engine mathematic-fonts scratch2 scratch sonic-pi nodered geany greenfoot claws-mail dillo idle3 python3-tk idle python-pygame python-tk
Installation for USB Boot
To give an indication on the performance increase - boot time is less - around 7 seconds from the 4 raspberries in the BIOS appearing. LibreOffice Writer loads in 5 secs and Chromium in a little over 3 secs.
The Pi foundation has made the USB boot setup process quite simply.
Starting with an existing microSD card image you first need to configure the Pi to boot from USB using the OTP (one time programming) option on the Pi3.
If your Raspbian install is up to date. Open a terminal session and enter:
# sudo apt-get update
# sudo apt-get upgrade
Now type the following to add the OTP command to the config file:
# echo program_usb_boot_mode=1 | sudo tee -a /boot/config.txt
Reboot the Raspberry Pi
After the Pi has rebooted enter the following into a terminal window and check that the OTP has been programmed with:
$ vcgencmd otp_dump | grep 17:
You should see the following:

Edit config.txt and remove line containing program_usb_boot_mode=1
Shutdown and power off the Pi.
Attach Pi Desktop hat with m-Sata card attached - do not put in case just yet!
Attach the micro USB to USB connector.
Power up Pi.
After startup start the SD Card Copier application found under Accessories on the desktop.
Select source and destination drives. This will copy contents of SD card to USB drive.
Shutdown and power off the Pi and remove the SD card.
Power up the Pi and it should now boot from the USB drive!!
You may now consider shutting down the Pi andfitting it into your case. With everything connected backup, power on and enjoy!
Installation for Pi Desktop
To give an indication on the performance increase - boot time is less - around 7 seconds from the 4 raspberries in the BIOS appearing. LibreOffice Writer loads in 5 secs and Chromium in a little over 3 secs.
Open Chromium and download Pi Desktop code base from www.element14.com/PiDesktop. Located under the download section is a file named "pidesktop-base.x.x.x.deb". Download this file.
Install the package typing in the following command into the terminal window:
$ sudo dpkg -i pidesktop-base.x.x.x.deb
Configuration
Update Raspbian OS
# apt-get update
# apt-get upgrade
Raspi Config
Run Pi configuration from either from the menu or the command-line:
$ sudo raspi-config
Update the following settings:
- Change the password for 'pi' user
- Set Locale
- Set Timezone
- Set Keyboard
- Set Wi-Fi Country
Desktop Clock enhancements
You can set the format of the desktop clock by changing the format string. For the full set refer to Ubuntu - Customizing the Clock. An example is provided below:
%A %b %d, %r
This will enhance the clock appearance to look like:
GPU Codecs
GPU Codecs can be purchased from the RaspberryPi foundation for a few dollars. Before you can order a GPU Codec license you'll need to identify the serial number of your Pi. Execute the following command and note the resuls:
GetSerial
Note down the serial and place your order via LINK.
Once you have received your codec keys use the following commands to unlock your device;
For MPG2 codecs:
vcgencmd codec_enabled MPG2
For WVC1 Codecs:
vcgencmd codec_enabled WVC1
Applications
FileZilla:
Filezilla is a easy to use FTP client support all of the FTP protocols.
$ sudo apt-get install filezilla
Applications Continued...
CUPS:
$ sudo apt-get install CUPS
Applications Continued...
Pinta:
$ sudo apt-get install Pinta
Applications Continued...
Libre-Office:
$ sudo apt-get install Libre-Office
Applications Continued...
Screenshot Utility:
$ sudo apt-get install gnome-screenshot
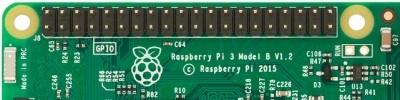
GPIO Header
One powerful feature of the Raspberry Pi is the row of GPIO (general purpose input/output) pins along the edge of the board, opposite side to the HDMI port.
These pins provide a physical interface between the Pi CPU and the outside world. At the simplest level, you can think of them as switches that you can turn on or off (input) or that the Pi can turn on or off (output). Of the 40 pins 17 of the 26 pins are GPIO pins; the remaining consist of 4 power, 8 ground pins and 2 ID EEPROM pins (leave these for the experts!).
The GPIO header allows you to connect up inputs in the form of a physical switch or a sensor or even a signal from another computer or device, for example. The output can also do anything, from turning on an LED to sending a signal to another device or controlling a motor. GPIO pins open up opportunities to control devices, or receive data back over a wired or wireless network and even over the internet. The python programming language, installed by default, contains libraries for accessing the GPIO pins. This opens up the Raspberry Pi to become an IOT device with relative ease.
WARNING: The GPIO pins go straight to the heart of the CPU and if you incorrectly connect to the wrong pin you'll most likely kill your Raspberry Pi.
Pi HAT adaptors
Fortunately there is a very safe way to use the GPIO pins - purchase a Pi Hat. A Hat (Hardware Attached on Top) is effectively a daughter board for the Raspberry Pi which conforms to a specific set of rules and automatically via the ID EEPROM pins configure the GPIOs and drivers for the board. There are numerous Pi Hats available to purchase on the internet depending on what you are wanting to achieve. Everything from high quality audio cards, CNC stepper motor controllers, Seismograph, LCD screens, LED light boards, buttons and other various sensor boards.
Useful Commands
CPU Infomation:
This command will identify the unique serial number of your RaspberryPi.
$ cat /proc/cpuinfo
Example output:
processor	: 0
model name	: ARMv7 Processor rev 4 (v7l)
BogoMIPS	: 38.40
Features	: half thumb fastmult vfp edsp neon vfpv3 tls vfpv4 idiva idivt vfpd32 lpae evtstrm crc32
CPU implementer	: 0x41
CPU architecture: 7
CPU variant	: 0x0
CPU part	: 0xd03
CPU revision	: 4

processor	: 1
model name	: ARMv7 Processor rev 4 (v7l)
BogoMIPS	: 38.40
Features	: half thumb fastmult vfp edsp neon vfpv3 tls vfpv4 idiva idivt vfpd32 lpae evtstrm crc32
CPU implementer	: 0x41
CPU architecture: 7
CPU variant	: 0x0
CPU part	: 0xd03
CPU revision	: 4

processor	: 2
model name	: ARMv7 Processor rev 4 (v7l)
BogoMIPS	: 38.40
Features	: half thumb fastmult vfp edsp neon vfpv3 tls vfpv4 idiva idivt vfpd32 lpae evtstrm crc32
CPU implementer	: 0x41
CPU architecture: 7
CPU variant	: 0x0
CPU part	: 0xd03
CPU revision	: 4

processor	: 3
model name	: ARMv7 Processor rev 4 (v7l)
BogoMIPS	: 38.40
Features	: half thumb fastmult vfp edsp neon vfpv3 tls vfpv4 idiva idivt vfpd32 lpae evtstrm crc32
CPU implementer	: 0x41
CPU architecture: 7
CPU variant	: 0x0
CPU part	: 0xd03
CPU revision	: 4

Hardware	: BCM2835
Revision	: a22082
Serial		: 000000004ac2f601
Running this command on a Raspberry Pi Model 3 B will currently return "Hardware : BCM2835". This is because Raspian is still only a 32bit operating system. For backwards compatibility the hardware version has been left the same. If indoubt simply read the silk screen printing on the CPU itself which states "BCM2837" which reflects a 64bit ARM A53 processor.
CPU Temperature:
Return the CPU temperature. You can use this to see the impact of butting your Raspberry Pi into an enclosure.
$ vcgencmd measure_temp
Example output: temp=54.8'C
Memory Split:
Shows how much memory is split between the CPU (arm) and GPU.
$ vcgencmd get_mem arm && vcgencmd get_mem gpu
Example output:
arm=948M
gpu=76M
Broadcom Firmware version:
$ vcgencmd version
Example output:
Oct 24 2017 17:09:22
Copyright (c) 2012 Broadcom
version a3d7660e6749e75e2c4ce4d377846abd3b3be283 (clean) (release)
Firmware Configurations:
Display the firmware configurations. These are either factory set, OTP (One Time Programming), Config.txt or the Raspi-config utility:
$ vcgencmd get_config int
Example output:
arm_freq=1200
audio_pwm_mode=1
config_hdmi_boost=5
core_freq=400
desired_osc_freq=0x36ee80
disable_commandline_tags=2
disable_l2cache=1
force_eeprom_read=1
force_pwm_open=1
framebuffer_ignore_alpha=1
framebuffer_swap=1
gpu_freq=300
hdmi_force_cec_address=65535
init_uart_clock=0x2dc6c00
lcd_framerate=60
over_voltage_avs=62500
over_voltage_avs_boost=62500
pause_burst_frames=1
program_serial_random=1
sdram_freq=450
temp_limit=85
Search
Search for a word or phrase: